Wednesday, 9 December 2015

How to make my Valkyrie Costume!!

Sorry I haven't been around for awhile, but due to having busy weeks previous I have only just managed to sit down to talk to you all.

Some Updates then.... The Lulu Cosplay is still in creation and unfortunately didn't make it to MCM Birmingham but hopefully will be ready for MCM Manchester next year. But I did complete my Valkyrie Cosplay and so here it is......


So this is my version of a Valkyrie with no weapon due again to time.
The wings you have seen before hand of how I made them. I know i am aware that they should be feathered but I decided to steam punk it up a little with make up and  jewellery on the day, just so the wings weren't so out of place.


So first up the skirt...


So as you can see the main skirt is just a suede Skirt I picked up at a shop it cost about £5 and then I bought a meter plether in brown which was roughly £8.25. I cut out a template for the shape I wanted and used it to make sure they all appeared the same. I measured out how many I would need but always make a couple extra just in case.  Once you have all of your leather pieces attach to the skirt with pins before sewing to assure they stay where you want them. Then get sewing :) When finished it will look like the picture above. Although as you can see in the finished picture of the whole costume there is gold circles they are eyes I punched into the fabric to give the leather a bit of weight as through the test run they were going all over the place, and no one wants that. The eyes I used which came with the device to put them in with cost me about £5 but not all of them were used so you get more than enough for your money same with the plether a metre was more than enough and I will have enough spare to make a small bag maybe. so all in all the skirt cost me about £16.25 to make after knocking off some for spare materials.

So to make the Vanguard and Vanbraces you will need...modroc, cling film. water,kitchen roll and scissors.


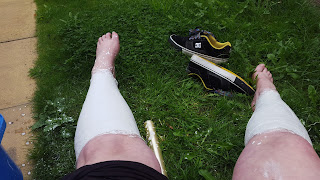
Start by cutting up your rolls of modroc into usable strips. I had a mix of longer and shorter strips. Once done cover the part you want to modroc, so in this case the shins and one forearm or two if you prefer, in cling film. This should stop any unwanted modroc getting onto your skin. Also if you have sensitive hands use gloves why applying the strips as it can dry your hands out while using.
Dip a strip into your bucket of water and submerge for around a minute make sure it is completely covered in water. Once soaked place the strips onto your leg and smooth out. i just wanted a basic shap of my leg and arm so they would be comfortable to wear but you can build whatever design you feel like. make sure everywhere is covered with 4-5 layers to make sure when it is dry it is solid to little layers and it will bend and flex. i left the very edges with less layering so it would be easier to cut of any access. once you have what you want leave to dry on your body for around 10- 15 mins so it is stable enough to be removed from your body. Then leave somewhere to dry over night.


Here are the finished pieces, once i removed them from myself. once dry cut off any access you don't want.


I decided to use cardboard to create my look. I used a template and then cut out many to match, then used a glue gun to attach them together so the end product looked like the picture to the bottom left.Repeat process for all the parts then leave to dry again before spraying your desired colour. I used gold for mine. The spray paint was around £5 a can and I used 2 on these parts and the helmet. The modroc was around £6 for 3 rolls and i used 2 altogether,
  Here they are sprayed Gold.
To finish them off I just pushed some holes in using a BBQ skewer and then threaded some leather laces to hold them in place on my legs and arm.


Lastly is the Helmet. To make it I bought a BMX helmet and filled in the holes using kitchen roll. Then I made a spike for the top out of card and glued it on using my glue gun. I also added 3 strips of card on top of each other to create some pattern.


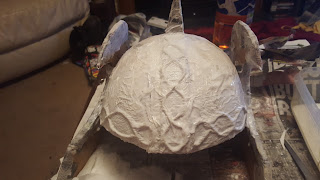
Here I cut out a cardboard shape to attach the feathers to. Once i had the shape I wanted I cut out 6 altogether and glued 3 on top of one another as you can see on the top picture. Once dried I stuck them onto the helmet itself in the desired place. Once all the card board was on you want to cover the whole thing with paper mache . I used 2 parts glue to one part water which I learnt of Art Attack when I was younger. ( God I miss that show so much cool things to make) once dried. I then placed string on the helmet to give it a pattern before covering the whole thing in a couple of layers of glue and kitchen roll.


Once everything was dry I then sprayed the whole thing with the Gold spray paint I had left over from before. So it went from this...

To this ^^^


The all there is left to do is cover the sides with lots and lots of feathers make sure you cover all off the bits that can be visible by passer by. I just used the glue gun again and the feathers where £2.75 a back from a craft shop I bought one big pack of smaller fluffier feather and 3 packs of the larger quill feathers to do this. Your end product should look something like this....

I used the larger feathers around the outer edge and the smaller ones on the inside closer to my face. All in all I was very happy with the way this turned out for my first try.


I hope you found this helpful and informative. Obviously these are just guidelines and anyone is free to adjust the designs to fit your personal preference. This was my first ever attempt at this kind of cosplay so noe i have made it i would adjust some of the things myself for example the BMX helmet was to wide so the whole thing looked a little far away from my face. But this is a learning process and I will love to hear constructive criticism on how I can improve in the future. Please feel free to follow and share this i would appreciate it if you could and I will see you all very soon.

Bye for now Amber Willow x 

Sunday, 23 August 2015

Eeek 2 costumes to make for MCM

Hey Everyone,

So I have been asked to make another costume for someone else for MCM. My boyfriend will be going and to say the least making stuff isn't his calling. But he is really good at thinking of demanding designs.

He is wanting to go as lulu from Final Fantasy 10. Yes that is a girl and no it isnt an issue for anyone that is thinking otherwise. Many people cross gender at comi cons because why not.

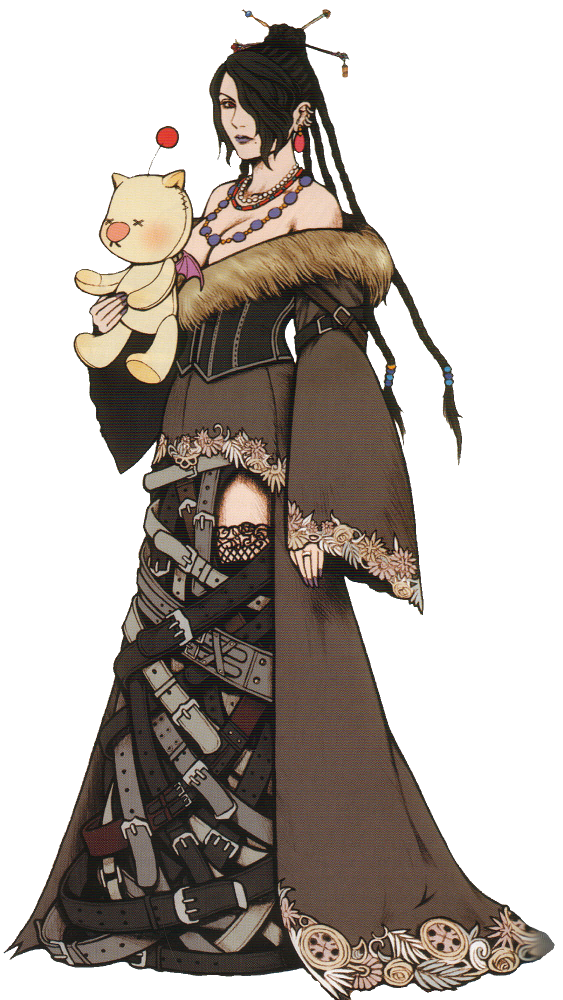
So for those that either don't know or don't really remember what she looks like here she is...


As u can see a lot of belts are in order most of which i am gonna buy from charity shops as not only does the money do something useful. They will also save me alot of money in the long run. I am also either going to buy a long silk dressing gown which i hope to find in a charity shop or buy some material and make one. I will see how the search goes first. As for everything else the wig will be bought and styled accordingly. The moggle will be bought and as fur is in fashion it wont me hard to find fur trim. The embroidary on the silk grown as i dont have time to actually embroider it i will buy lace panels to sew on after fabric dying them the right colours.

So that is the first plan of how i am going to do it but obviously plans change. So we will just have to see how things go. I will keep you all up to date with plans and the makeing of so please subscribe if u want to see more.

Love you all
Jess
X

Monday, 27 July 2015

MCM Birmingham Idea 2015


Hey everyone,

So MCM is on the way. Some have already been but I'm focusing on Birmingham on the 21st November. As it give me more time to prepare. I was struggling on what I wanted to do, I had 2 possible ideas but was torn. Would I become Maleficent the Mistress of all evil. Or would I be a Valkyrie an Angel of death . But after long thought and help from my friends on Facebook I decided to be....


Art work by yigitkoroglu on DeviantArt

That's right I am going to be a Valkyrie. I mainly decided on this due to the fact that I feel I will be able to pull off the character of a Valkyrie more so than Maleficent. Not that she is awesome in her own way, it is just I have never been able to pull off evil characters. Hence why I never played them when I was on stage. 

So things I have planned so far.

I have been thinking of possible ways to make my costume. I want it to be a lot more hands on this time. I don't want to buy many already made items. Obviously I will have to buy some but I would rather make as much as possible. So as far as my armour is concerned, I have purchased some modroc which is what they use to do plaster casts for broken bones. It can be bought at most craft shops or if you cant find any there is loads of different lengths and sizes on Amazon which is where i got mine. It turned out to be 4 pound for three 3m rolls i bought 2 lots so it cost me 8 pound all together. 18m I am guessing is going to be more than enough but I wanted to be on the safe side and for that price you can't say no right?

I will of course do a post of the making of when the weather is actually going to permit me to. 
I have been looking up ways to make my very first LARP style sword which will be within the rules of MCM which i am so looking forward to and can't wait to design the look of it. And after looking at my current wing set I have come to the realisation that I can't use the current frame I have made so I am going to have to come up with something new that will work for feathers rather than canvas.

So there you have it that is going to be my next cosplay. I am so excited it is 1 in the morning and I want to start now. But alas I must sleep for tomorrow is another day.  

So it is goodbye for now I will be back soon hopefully with a start to what I'm sure will be a fun project. 
love to you all
Jess
x


Saturday, 25 July 2015

2nd Steampunk cosplay Goth Weekend 2015 how to make Articulated Wings

Hey everyone

So this was my latest cosplay...

As you can see I went more ornate with this one. Alot more effort went into making this cosplay as I had more time to prepare. Most of the main costume was again bought on a budget. I reused the skirt from my previous attempt and bought the shirt for around 5 pound in a charity shop. The under bust corset was the most expensive purchase coming in at around 40 pounds from corsets uk. But enough of the bought stuff right?

The wings were made in the space of 2 days and were surprisingly easy compared to how I imagined it to be.

The main structure was created from plastic pipe you use to hide wiring against walls. Which can be purchased at most hardware stores. not only is it light weight but it is flexible. So if you are clumsy like me and forget the put them down going through doors you wont actually hurt yourself or the wings them self. They were fixed together with standard nuts, bolts and washers so they worked like hinges making the wings were easy to pull up with little force. And part of the left over pipe was used to insure that the cord used to pull up the wings had a path to follow. The cloth is a little weight canvas style fabric which was cut to a diamond shape that fit the wings and then attached at the top and side with cord and with white cable ties on the middle arm.


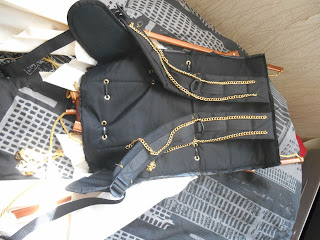
The harness was literally just the back of a back pack which I cut off all the extra fabric and then put in some eyes and attached the frame on with black cable ties. Added extras like gold chains where sewn onto the back pack to make it look a little less obvious. And the frame was spray pained copper to look more like metal.

The cord was fixed round the waist with a belt buckle fastening to keep the wings up if desired. Otherwise they hung down by your sides as the cord when though hoops which I attached to the sides of my corset so that the cord was easy to find and I wasn't messing around trying to find it.
 So that is the wings.....

My make up was simple just golds and browns. The watch parts were bought on Ebay for around 5 pounds for a small bag full so I had more than enough, and they were attached with eye lash glue. which is strong enough to keep them on but easy to remove when wanted. My lips where done with bright red lip stain and they a small amount of gold eye shadow in the middle to achieve a more 3D effect. Finished off with false eyelashes and of course the bright red wig and circlet both from amazon.

   So that was my 2nd Cosplay. I hope you found this interesting and if anyone has any questions about the wings or anything else please don't hesitate to ask.

Love to you all.
Jess
x

First ever steam punk cosplay for Goth weekend 2014

Hey everyone,

 So I thought I would take you back in time a little bit. This was my first ever steampunk inspired Cosplay. Unfortunately not many pictures were taken and I only have the one selfie with a friend. Most of my stuff for this one was bought and very little was made for this costume, but I did make a bag and gun holster and the bullet carrier looking thing was actually two belts put together to create the look of ammo. So keep an open mind while looking for things. Always think out the box if you can't find the exact thing you are after, or if things are expensive.


About me

Hey everyone,

My name is Jess and I enjoy to Cosplay. So I thought I would set up this blog to post up current Cosplay ideas with tips on how to make my costumes. Not only that but I am a plus sized girl and I want others to know that it doesn't matter about your size if you love something go out and do it and don't be ashamed to be you. As I have seen other plus sized Cosplayers say this I will join in Big Girls Cosplay Too!!

And it is about time the stigma in body image was broken. And so it is time to get out girls and boys and start showing people that it doesn't matter what other people think we are us and we can go out and dress up and have fun as much as the next person!!

As I am pretty new to Cosplay myself, join my on my journey to creating and Cosplaying some of my favourite characters, and themed costumes.

Love to you all
Jess
x