Some Updates then.... The Lulu Cosplay is still in creation and unfortunately didn't make it to MCM Birmingham but hopefully will be ready for MCM Manchester next year. But I did complete my Valkyrie Cosplay and so here it is......
So this is my version of a Valkyrie with no weapon due again to time.
The wings you have seen before hand of how I made them. I know i am aware that they should be feathered but I decided to steam punk it up a little with make up and jewellery on the day, just so the wings weren't so out of place.
So first up the skirt...
So as you can see the main skirt is just a suede Skirt I picked up at a shop it cost about £5 and then I bought a meter plether in brown which was roughly £8.25. I cut out a template for the shape I wanted and used it to make sure they all appeared the same. I measured out how many I would need but always make a couple extra just in case. Once you have all of your leather pieces attach to the skirt with pins before sewing to assure they stay where you want them. Then get sewing :) When finished it will look like the picture above. Although as you can see in the finished picture of the whole costume there is gold circles they are eyes I punched into the fabric to give the leather a bit of weight as through the test run they were going all over the place, and no one wants that. The eyes I used which came with the device to put them in with cost me about £5 but not all of them were used so you get more than enough for your money same with the plether a metre was more than enough and I will have enough spare to make a small bag maybe. so all in all the skirt cost me about £16.25 to make after knocking off some for spare materials.
So to make the Vanguard and Vanbraces you will need...modroc, cling film. water,kitchen roll and scissors.
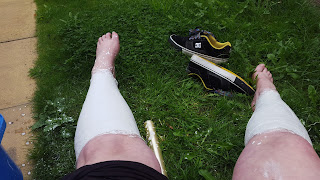
Start by cutting up your rolls of modroc into usable strips. I had a mix of longer and shorter strips. Once done cover the part you want to modroc, so in this case the shins and one forearm or two if you prefer, in cling film. This should stop any unwanted modroc getting onto your skin. Also if you have sensitive hands use gloves why applying the strips as it can dry your hands out while using.
Dip a strip into your bucket of water and submerge for around a minute make sure it is completely covered in water. Once soaked place the strips onto your leg and smooth out. i just wanted a basic shap of my leg and arm so they would be comfortable to wear but you can build whatever design you feel like. make sure everywhere is covered with 4-5 layers to make sure when it is dry it is solid to little layers and it will bend and flex. i left the very edges with less layering so it would be easier to cut of any access. once you have what you want leave to dry on your body for around 10- 15 mins so it is stable enough to be removed from your body. Then leave somewhere to dry over night.
Here are the finished pieces, once i removed them from myself. once dry cut off any access you don't want.

I decided to use cardboard to create my look. I used a template and then cut out many to match, then used a glue gun to attach them together so the end product looked like the picture to the bottom left.Repeat process for all the parts then leave to dry again before spraying your desired colour. I used gold for mine. The spray paint was around £5 a can and I used 2 on these parts and the helmet. The modroc was around £6 for 3 rolls and i used 2 altogether,
Here they are sprayed Gold.
To finish them off I just pushed some holes in using a BBQ skewer and then threaded some leather laces to hold them in place on my legs and arm.
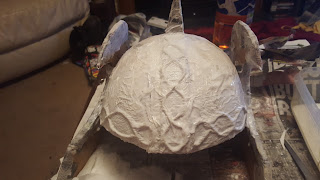
Lastly is the Helmet. To make it I bought a BMX helmet and filled in the holes using kitchen roll. Then I made a spike for the top out of card and glued it on using my glue gun. I also added 3 strips of card on top of each other to create some pattern.

Here I cut out a cardboard shape to attach the feathers to. Once i had the shape I wanted I cut out 6 altogether and glued 3 on top of one another as you can see on the top picture. Once dried I stuck them onto the helmet itself in the desired place. Once all the card board was on you want to cover the whole thing with paper mache . I used 2 parts glue to one part water which I learnt of Art Attack when I was younger. ( God I miss that show so much cool things to make) once dried. I then placed string on the helmet to give it a pattern before covering the whole thing in a couple of layers of glue and kitchen roll.
Once everything was dry I then sprayed the whole thing with the Gold spray paint I had left over from before. So it went from this...
To this ^^^
The all there is left to do is cover the sides with lots and lots of feathers make sure you cover all off the bits that can be visible by passer by. I just used the glue gun again and the feathers where £2.75 a back from a craft shop I bought one big pack of smaller fluffier feather and 3 packs of the larger quill feathers to do this. Your end product should look something like this....
I used the larger feathers around the outer edge and the smaller ones on the inside closer to my face. All in all I was very happy with the way this turned out for my first try.
I hope you found this helpful and informative. Obviously these are just guidelines and anyone is free to adjust the designs to fit your personal preference. This was my first ever attempt at this kind of cosplay so noe i have made it i would adjust some of the things myself for example the BMX helmet was to wide so the whole thing looked a little far away from my face. But this is a learning process and I will love to hear constructive criticism on how I can improve in the future. Please feel free to follow and share this i would appreciate it if you could and I will see you all very soon.
Bye for now Amber Willow x


No comments:
Post a Comment